Just-in-Time (JIT) user provisioning is an advanced IAM feature offered by Asgardeo. It is utilised to automatically create user accounts in your organisation whenever a user logs in with Single Sign-On for the first time.
Intended audience
It’s always better to know some general IAM concepts, but it’s completely alright if you don’t have prior knowledge. You can super digest this article if you have a high-level understanding of how modern user authentication works.
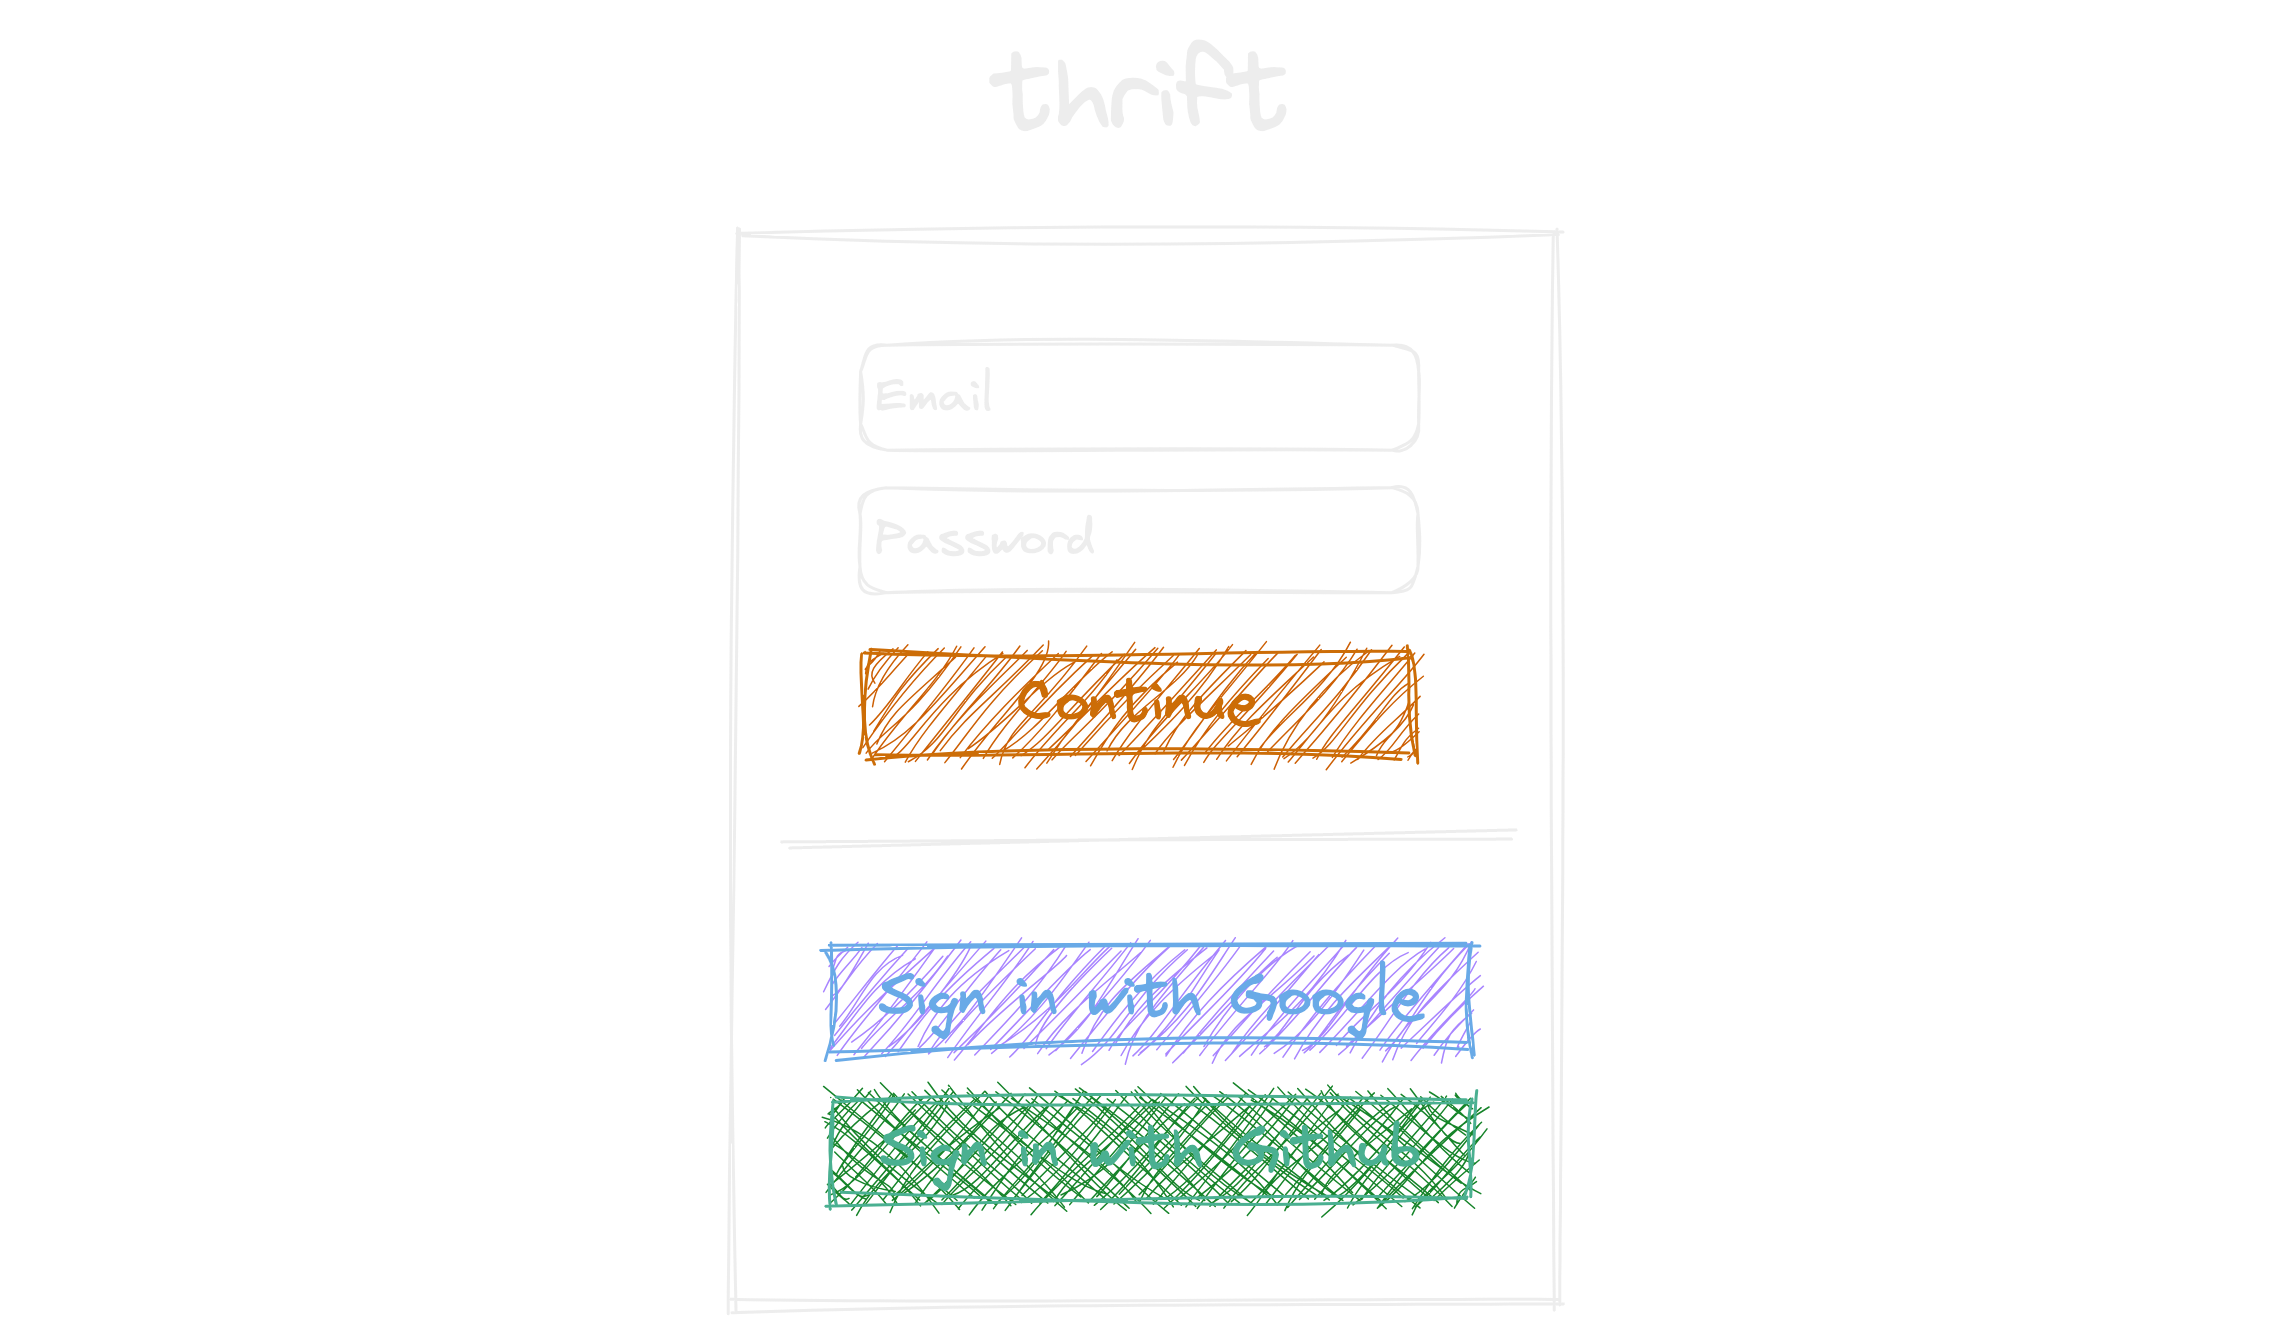
First, we will look at a simple example to properly understand how JIT works in practice. Now, let’s imagine you’re trying to log in to this application called Thrift for the first time. Thrift is an application with multiple authentication options such as email and password and sign-in with Google or GitHub social accounts.
Suppose it uses Asgardeo as its IAM solution 🥳.
Instead of entering your email and a new password to create an account, you are about to use one of your already logged in social accounts (i.e., GitHub or Google).
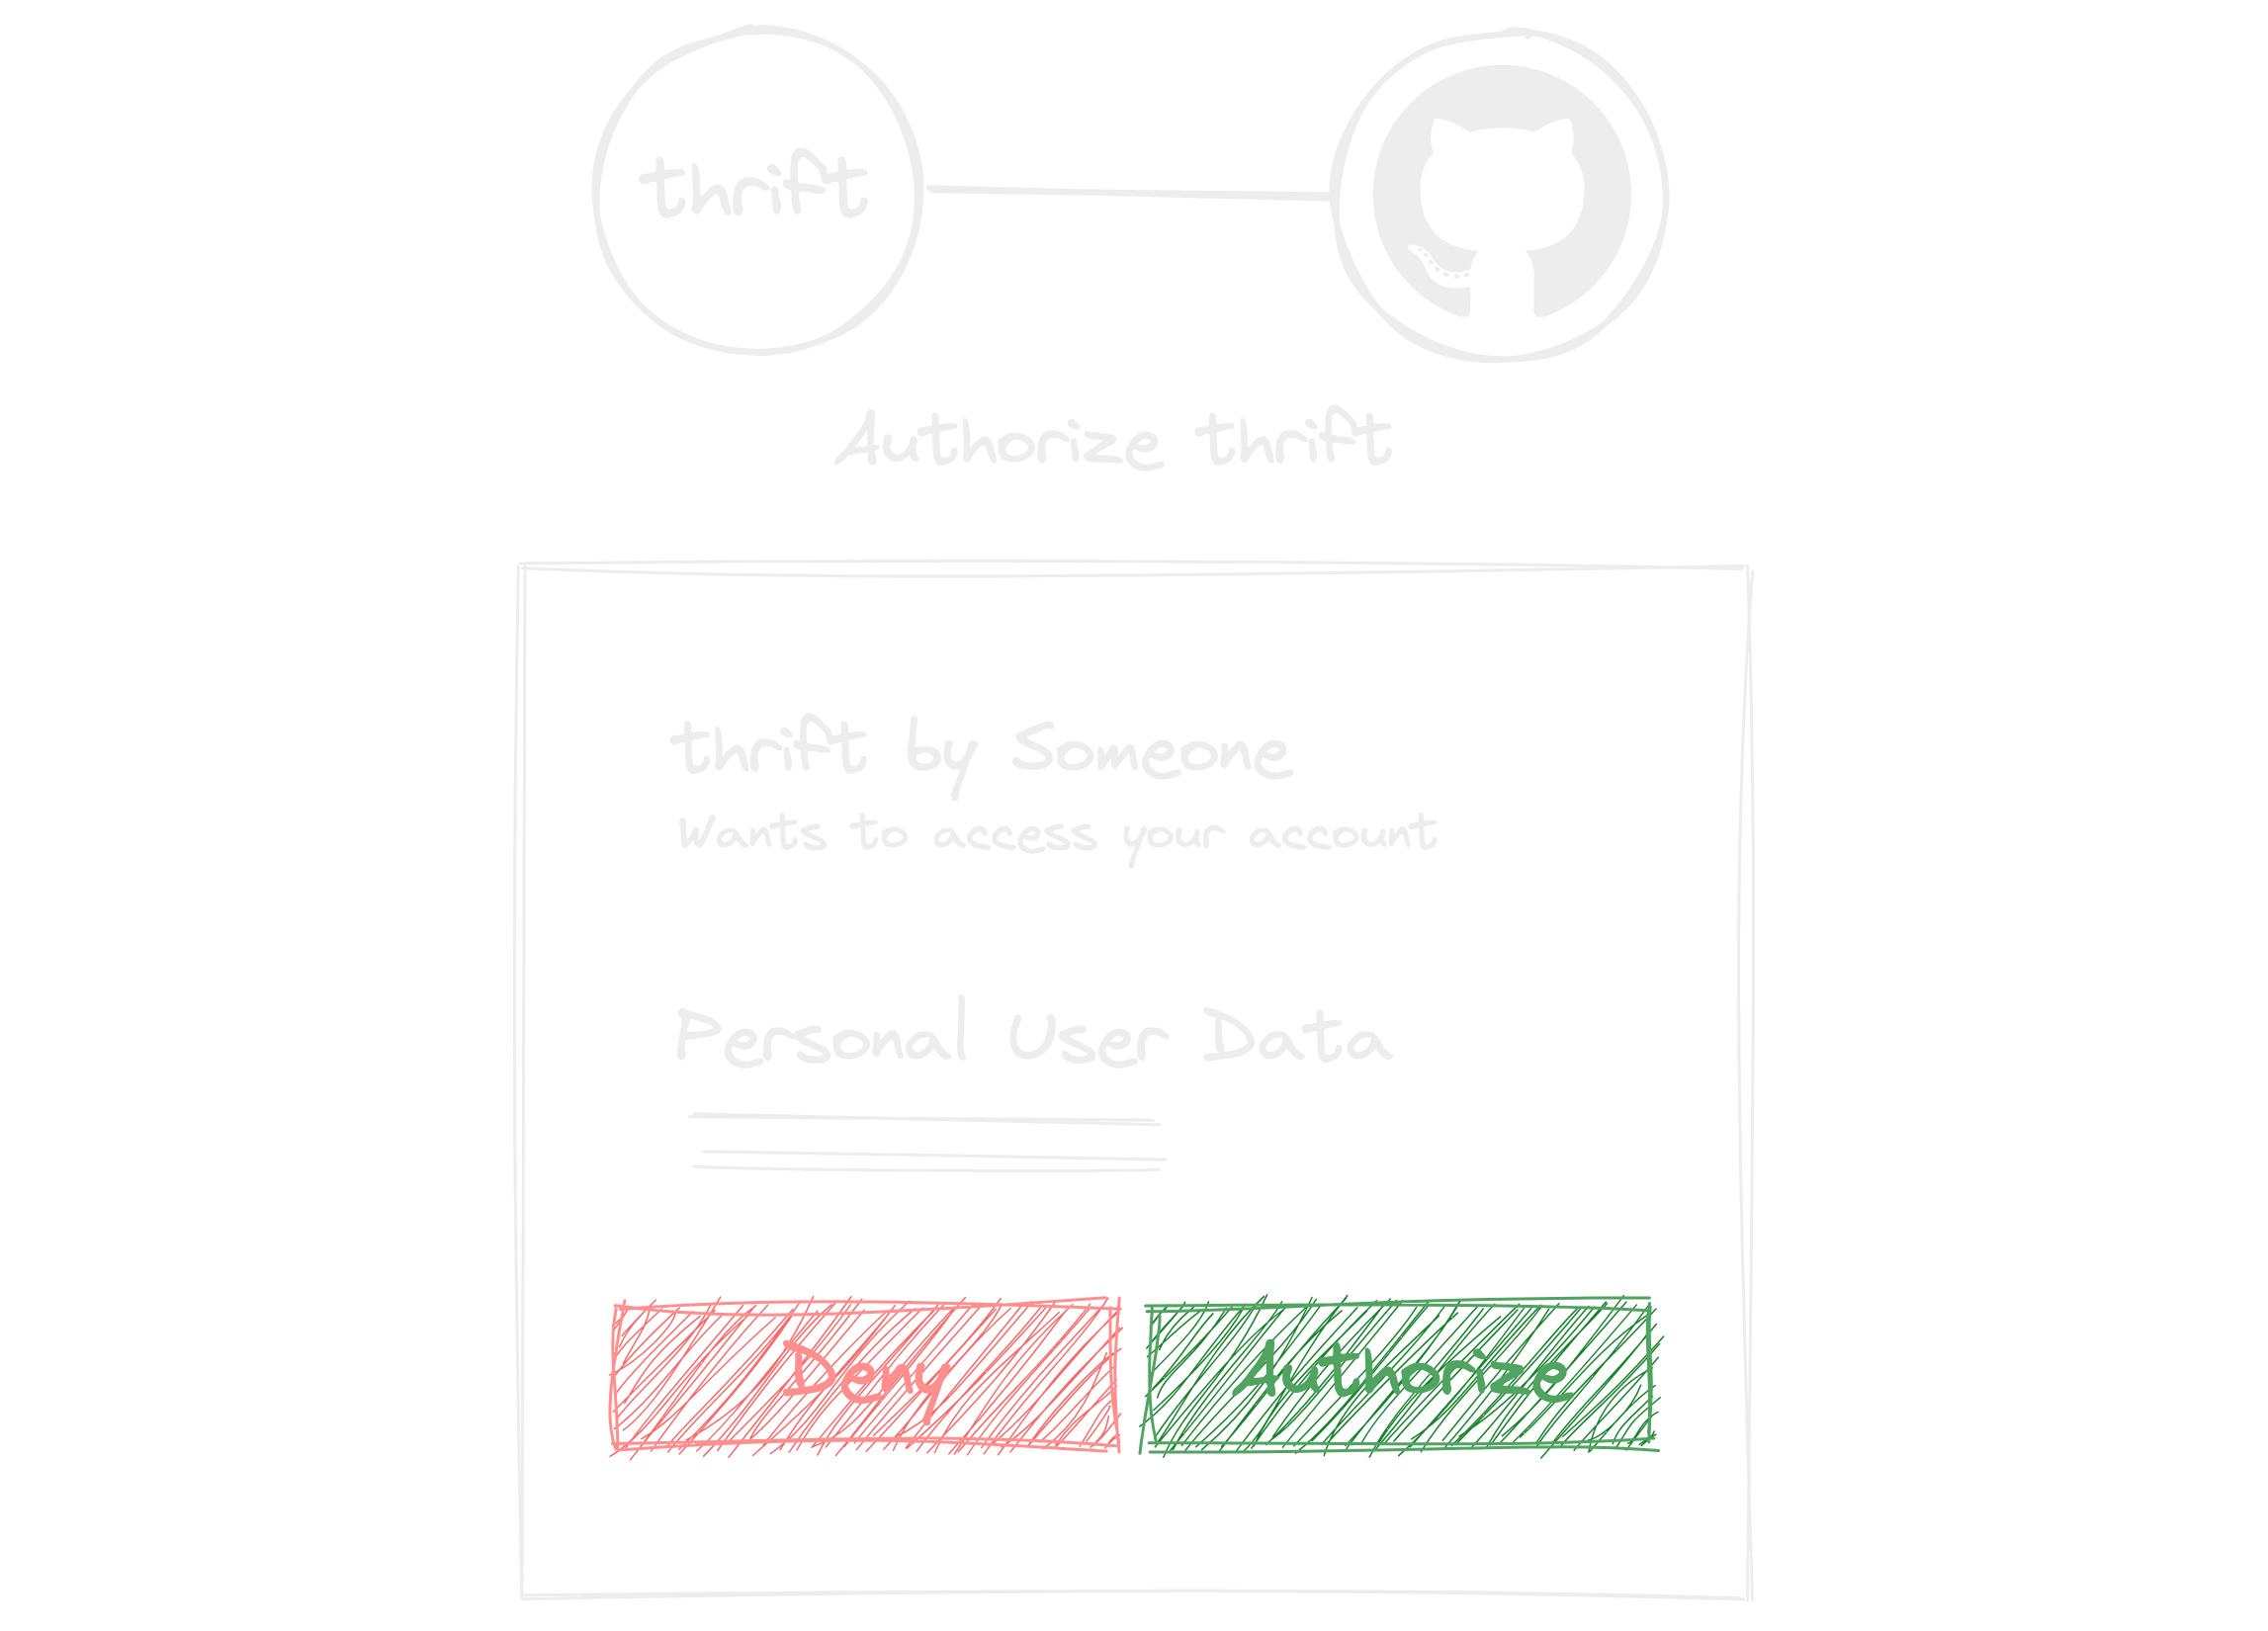
At this point, to authenticate into the application, Thrift’s IdP (Asgardeo) takes you to GitHub’s authorisation page to get consent on what sort of information and permissions Thrift is using on behalf of you if you grant access.
Now, if I click on Deny, GitHub will take me back to Thrift’s home page or sign-up page1. But what happens when I click on Authorize, huh? Well, there’s a hefty amount of things Asgardeo should do on behalf of Thrift to give me a seamless login user experience.
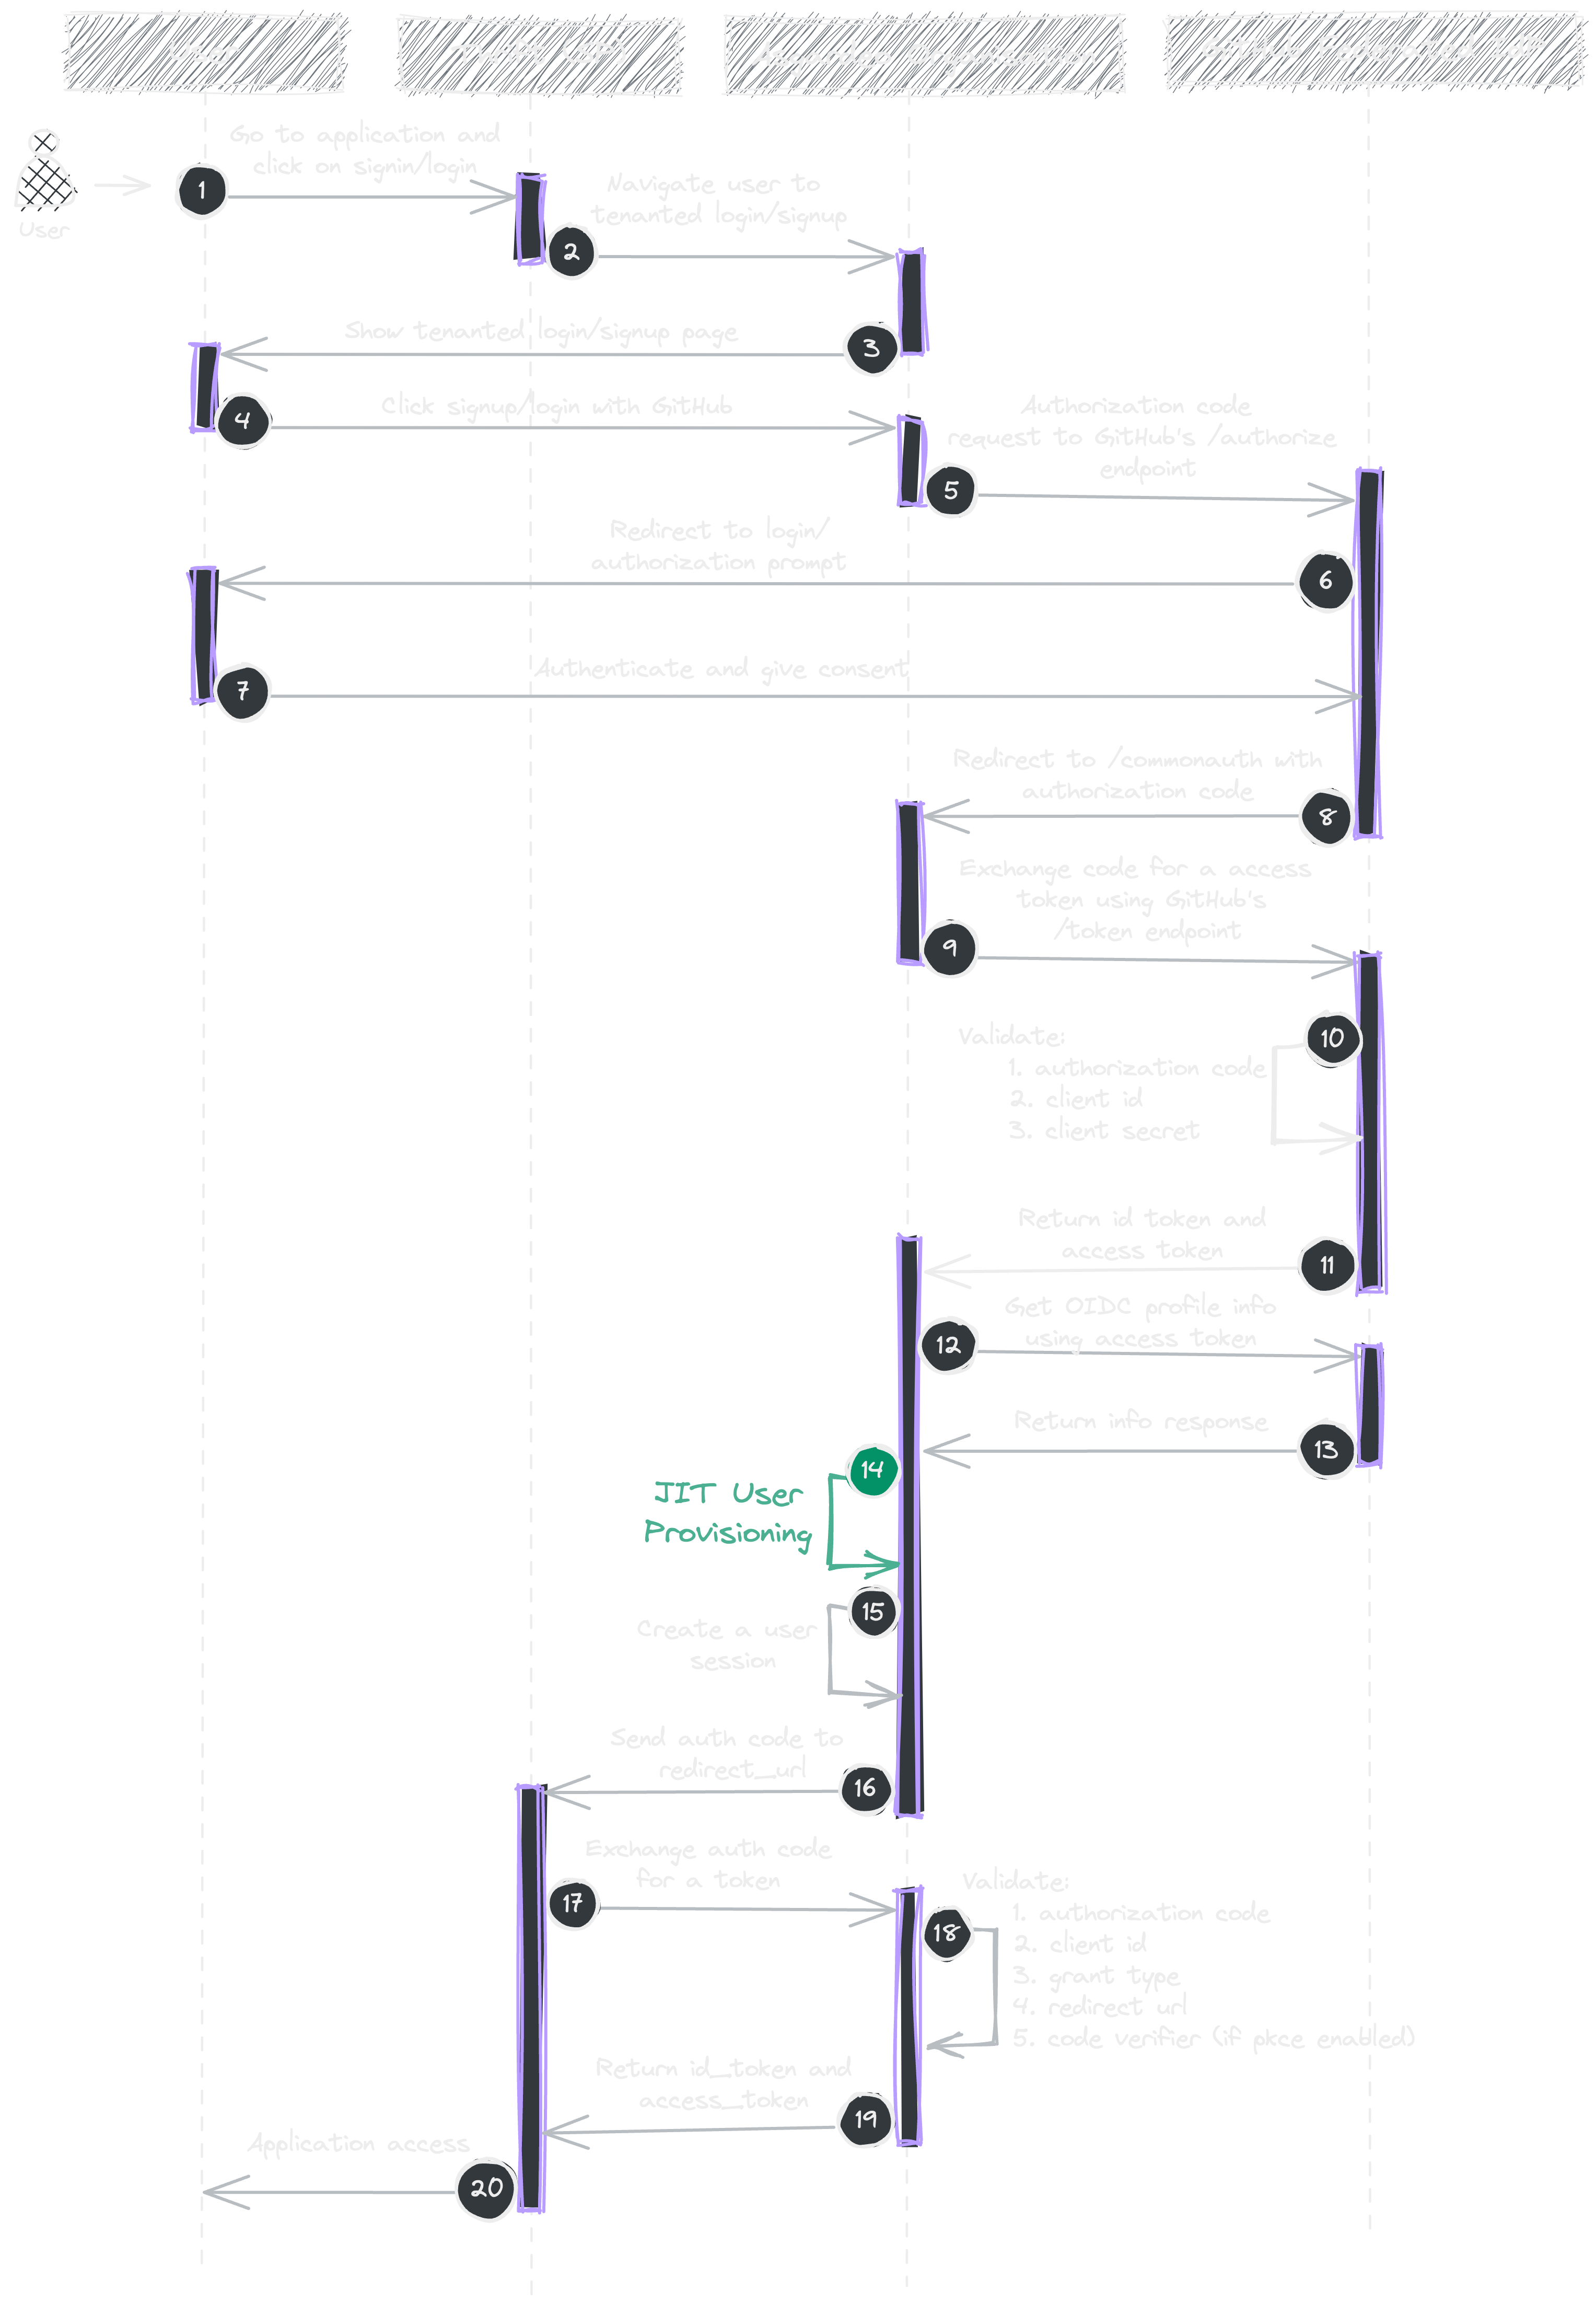
So let’s try to understand what’s happening here. This is a swift flow of what users go through.
You navigate to Thrift’s home page and proceeds to sign-up.
Then, Thrift redirects you to its authentication server (Asgardeo).
Say you chose GitHub. Now, Asgardeo redirects you to GitHub’s authentication server to authenticate and get consent from you.
Once you click Authorize, GitHub redirects you back to Asgardeo, saying GitHub is happy and allows Asgardeo to access User information.
Once the information is retrieved, Asgardeo creates a session for you and redirects you back to the application with a code so that Thrift can authenticate with Asgardeo again so you can get into the app.
Everything is seamless, right? Sometimes, it almost feels like magic to me! But in reality, it is not. We have missed one crucial thing Asgardeo does behind the scenes. This is where JIT comes into play!
Behind the scenes
Do you remember when we initially started? Neither Asgardeo nor Thrift knew anything about me when I signed up via GitHub. I didn’t have any account created in Asgardeo before.
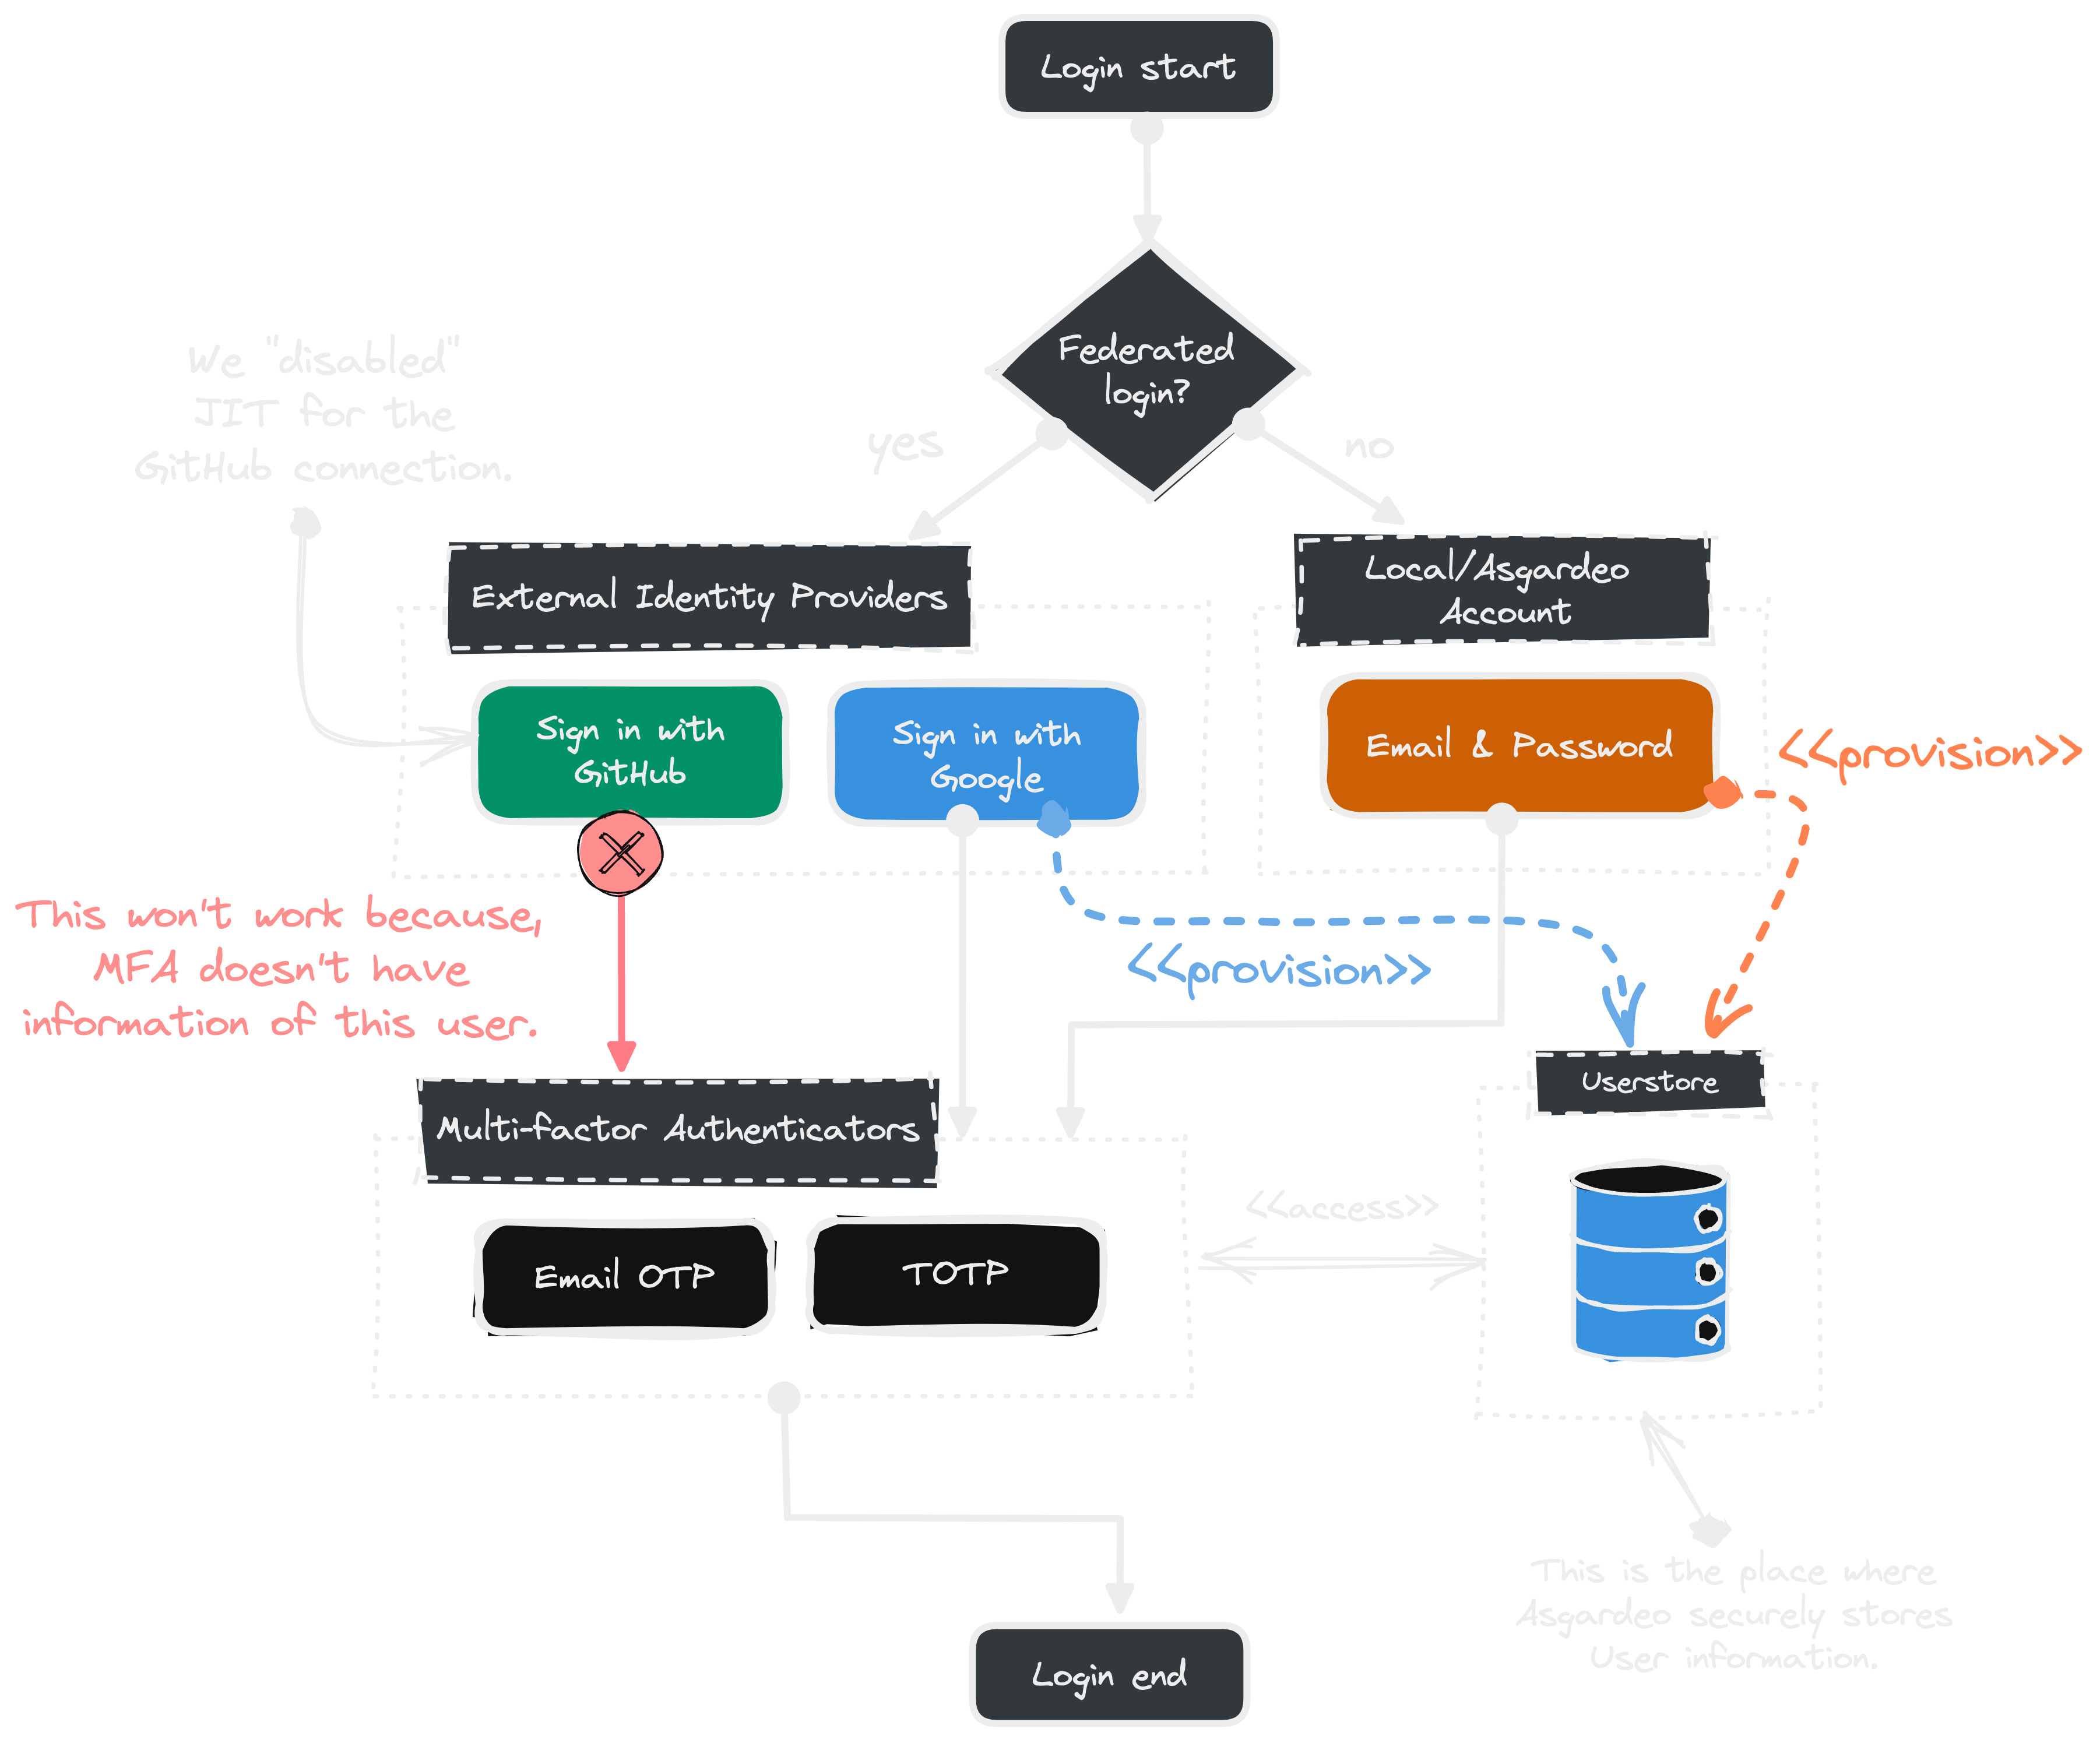
When signing up via a federated connection, the system must decide whether to provision this federated user account on organisation premises or not. Therefore, this feature’s fundamental goal is to create user accounts on the fly without creating them in advance.
Let me reiterate this scenario visually.
Do you see? JIT provisioning happens in the middle of an authentication flow. Asgardeo can create users on the fly without creating user accounts in advance and provision them just in time in a targeted user store. This seems so simple, but Asgardeo does all the heavy lifting for Thrift.
Demonstration
Before we begin, we need to have a functioning application (also called the service provider). Also, we need two federated connections (external identity providers) and add the SP as an application under an Asgardeo organisation.
This is how you create an application in Asgardeo. First you navigate to the landing page. From there onwards select the category of your app and fill in the required fields and hit Register. Now you have a registered application ready to be used 🎉.
What is an Authorized Redirect URI?
The redirect URL (sometimes aliased as the Callback URL of an application) is given while registering your app with Asgardeo. It determines where Asgardeo redirects the user after completing a successful authentication flow or a logout request.
The value of this parameter must exactly match the signInRedirectURL and signOutRedirectURL in your SDK configuration.
How can I add different Redirect URLs?
Asgardeo allows you to add multiple redirect_urls. If you wish to add different redirect URLs for sign in and sign out, ensure you configure them correctly in your app configuration.
For example, this is how your authentication configuration should look like: -
To demonstrate how JIT works, we require two federated connections. It can be either enterprise connections or social connections. To make things simpler, I’m using Google and GitHub connections. Once created, we have to loan this information (client_id, client_secret) to Asgardeo.
Below videos are a skimmed version of the above guides.
Add Google and GitHub connections to authentication Step 1.
Scrumptious Bits
To make the login and sign-in experience even more delightful, having a customised login/register page would be great, isn’t it? No worries. Asgardeo got you covered! Asgardeo now allows you to apply customised branding styles to your organisation! How convenient!
This is the custom branded login page of our Thrift application.
This new Branding feature lets you control the title, colours, links, policies, terms and much more cool stuff that shows up on pages related to the authentication & authorisation lifecycle. It ensures that you can deliver a seamless login experience to your customers.
Trying it out
Now, we can try out a login flow to see how it functions. To reiterate, remember that Asgardeo keeps JIT enabled by default. So, every first-time federated login will provision a user account on Asgardeo.
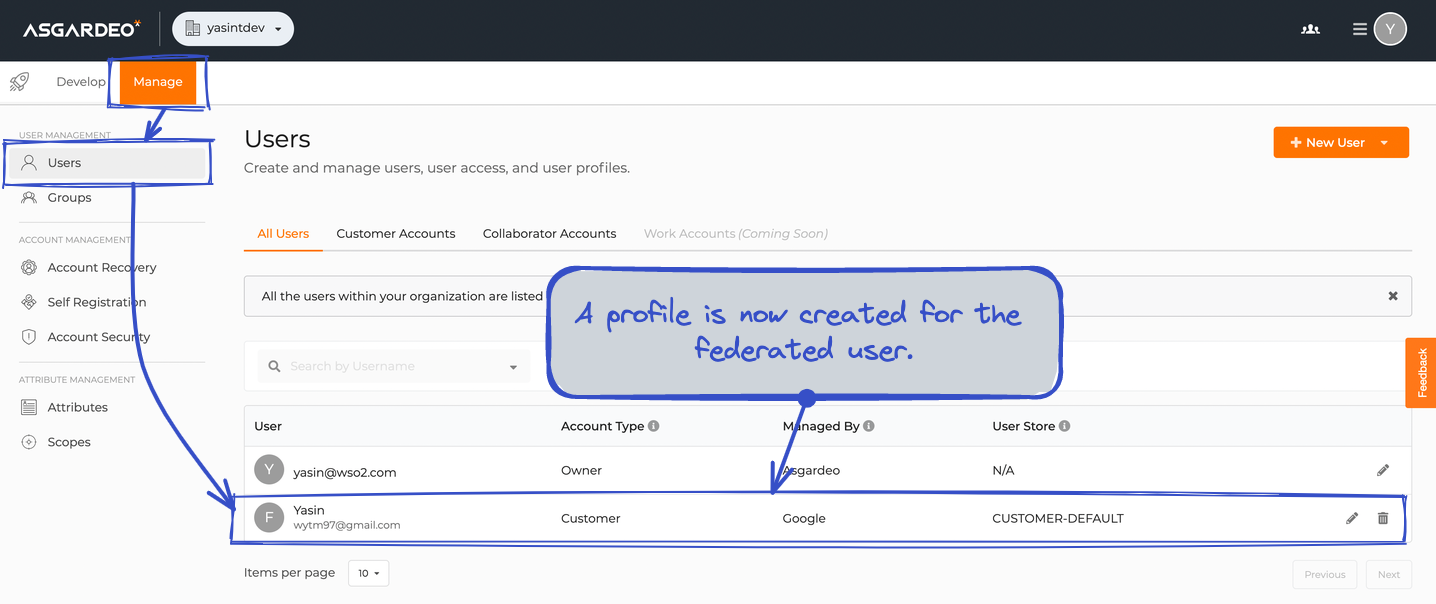
Signing up to Thrift via the federated connection Google.
Next, if we check the Users section on the Asgardeo Console, we can see that Asgardeo has created a user profile under my organisation.
Woohoo 🥳🎉, now we know how everything connects together, and it is time to shift some gears. What’s even crazier is that Asgardeo allows you to control this cool feature! You can decide whether to keep auto-provisioning enabled or disabled 🤯.
How cool is that?
Disabling automatic provisioning
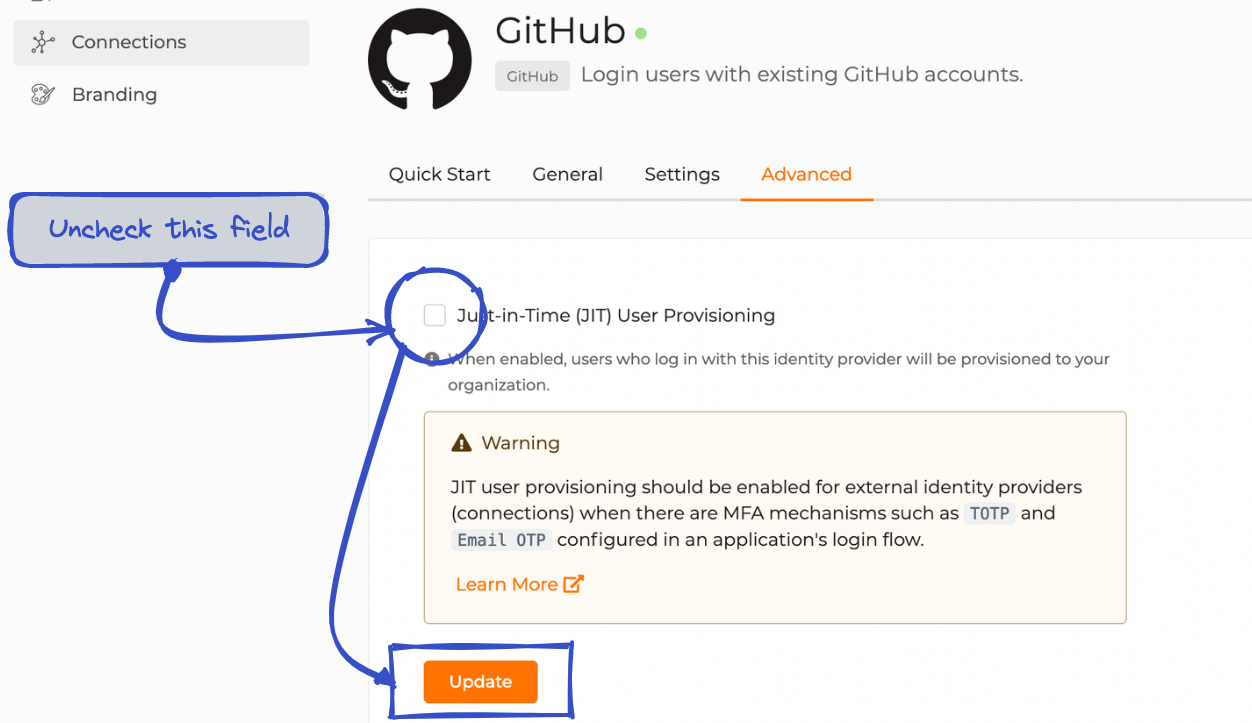
Disabling JIT is straightforward. First, we navigate to a configured federated connection. And then, go to its Advanced settings and uncheck the field.
Why Disable Fancy JIT?
Ideally, as an organisation or a organisation admin, it’s a decision you have to make. You have to choose whether federated users must provision to the local user store or not. Remember that this decision must be taken prudently (I will tell you why shortly).
Trying it out
Now, we can try out an authentication flow with JIT user provisioning disabled for GitHub connection… So preferably if we log in using GitHub, it should not provision users in our user store (this is the expected behaviour ⚠️).
Signing up to Thrift via federated connection GitHub. And then, validating whether the user is not provisioned in the local user store.
Now we know how to disable JIT user provisioning in Asgardeo, but at what cost, though?
According to Asgardeo’s documentation, if we disable JIT, we need to handle its side effects on configured applications carefully. Luckily, Asgardeo is smart. It will warn you beforehand if something hairy is going to happen. However, to avert the conflicts, first, we need to understand the complexities.
Perils of disabling JIT
Disabling JIT yields a few issues that affect the authentication flow of an application. Sometimes, if not configured correctly, it leads to poor user experience. Now let’s see what these issues are.
Conflict with multi-factor authenticators
Asgardeo has advanced Multi-Factor Authentication (MFA) features such as TOTP, Email OTP, and Biometric authentication to secure user accounts. Usually, MFA allows you to grant access to resources by using two (2-Factor) or more (Multi-Factor) factors to authenticate users. It provides an additional layer of security to the resource.
Let’s configure some MFAs to our application, Thrift.
Configuring MFA to Thrift's sign-in method. Navigate to Develop > Applications > thrift > Sign-in Method and create a new step for MFA. Then, proceed to add MFA by clicking + Add Authentication. Finally, hit Update and bam 🎉!
When you integrate one or more MFA to an application’s sign-on sequence, the flow expects a provisioned user account to be in a user store so that it can validate who you are.
Inherently, MFA handlers require user information to function properly. When we disable JIT for a particular IdP, the system cannot identify and persist information of a user. Thus making the flow ambiguous during multi-factor authentication.
Well, how can we prevent such scenarios?
Asgardeo gives us two choices: -
Enable JIT User provisioning for the target connection
Conditionally skip MFA for external connections during the login flow.
// Email & Password authenticator is named as "LOCAL".var localAuthenticator = "LOCAL";var onLoginRequest = function (context) { executeStep(1, { onSuccess: function (context) { var step = context.steps[1]; // {@code step.idp} is the name that we give // during the connection creation. if (step.idp === localAuthenticator) { executeStep(2); } } });};
You should place this snippet in the Conditional Authentication Section. First, navigate to Applications > Thrift > Sign-in Methods. And then, Toggle [Conditional Authentication] switch to bring up the script editor. Finally, paste the snippet and update 🎉.
Keeping Things Facile
Well why do we need MFA for social connections anyway? Right on point! I’m glad you asked. The answer is simply NO. We don’t have to configure MFA to social connections23.
Restricted MyAccount access
Since the login happens in a pass-through mode, these users’ profiles aren’t logical. Users can still log in to the Thrift app using their accounts, but Asgardeo will not allow them to proceed to the My Account application.
All the user attributes derived from the external IdP will also be pass-through to the application (Thrift) without having the capability of editing them anywhere.
Ah, you got me there!
Okay, okay, I’ll admit it. I lied. Currently, Asgardeo doesn’t allow federated connection logins through My Account (But the behaviour is very much the same as I explained above. So don’t forget that!). Regardless of whether JIT is enabled or disabled.
This is because Asgardeo is still in its baby steps. Support for that capability will be enabled soon. When that happens, I’ll make sure to update this article. I pinky swear!
What JIT brings to the table?
In general, JIT user provisioning aims to reduce your workload and save time when managing federated user identities. Otherwise, you would have to create accounts manually through APIs whenever a new user registers for your application using SSO.
JIT user provisioning is Asgardeo’s fancy way of handling this complexity. JIT is handy when you integrate social connections tailored for specific use-cases such as event-based login and short lived applications. Also, in the same way, if we disable JIT, we can shun federated user accounts in the organisation for niche use-cases.
Conclusion
Whew! If you made it all the way here, thank you! I admire you. We learned a few things about Asgardeo’s JIT user provisioning feature. Let’s summarise what we have learned so far.
It’s an advanced feature engineered to handle complexities during federated user authentication.
JIT user provisioning happens in the middle of an authentication flow.
Asgardeo allows you to control (enable/disable) this feature.
When enabled, a user profile is created in the local user store to persist information. It creates users on the fly.
When disabled, access to the application happens (Service Provider) in a pass-through mode (without creating user accounts in advance).
When disabled, we need to carefully handle the application’s authentication flow and ensure it does not break.
And that’s it! I hope you’ve enjoyed this methodical approach on how JIT user provisioning works in Asgardeo, and thanks again for reading!
Footnotes
Typically, this is addressed as access_url of an application. And it is used to navigate through catalogue and discovery flows. Asgardeo allows you to configure this URL dynamically under Develop > Applications > YOUR_APP > General settings. ↩
Social giants like Google, Facebook, and GitHub already have MFA configured in their authentication and authorisation flows. The main reason is that; going through multiple MFA flows in two different identity providers will lead to a poor user experience. Therefore as developers, we can logically reason why we skip MFA for these connections. ↩
When I’m login in through Google, it usually prompts me a notification on my phone saying (using another authenticated Google app like YouTube, GMail, or Google Photos), Is this you who are trying to log in? or Enter the 2FA code sent to your mobile phone. Now assume I completed either one of those. If everything goes well, I’m already validated by Google. So, it doesn’t make sense to initiate another MFA flow in our application if I sign in using Google, right? ↩