The ffmpeg command line tool is a hyper-fast video and audio converter that can also grab from a live audio/video source. You can use it to convert arbitrary sample audio/video rates and resize/trim videos on the fly with a high-quality polyphase filter.
Installing ffmpeg
If you don’t have
ffmpeginstalled in your system you can refer how to install ffmpeg in your operating system. Or if you’re on macOS just dobrew install ffmpeg1
Suppose you want to fast-forward this masterpiece by 2x:-
Fast-forward (video only)
ffmpeg -i hehe-peter.mp4 \
    -filter:v "setpts=0.5*PTS" \
    -preset fast \
    -crf 24 \
    -c:v libx264 \
    -an \
    output-without-audio-but-2x-speed.mp4
When you execute the above with the correct inputs, the output file will contain the fast-forwarded video file without the audio stream.
However, if you still want to fast-forward both audio and video simultaneously, you must use a complex filter. I will teach you how we can do that in the end. But first, let’s understand what the above command does.
Behind the scenes
-i hehe-peter.mp4
The string hehe-peter.mp4 followed by the -i flag describes location of the
source input file. Conversely, the last argument for the command is the name/target
file name for the output.
-filter:v "setpts=0.5*PTS"
The “setpts” filter changes the “PTS” (presentation timestamps) of video frames.
This is the filter we use to change the frame rate and do slow-motion or fast-motion
effects. The filter accepts an expression that specifies the new value of the
PTS. For example, setpts=0.5*PTS will double the frame rate, effectively
making the video play at 2x speed.
-preset fast
This argument specifies the speed-to-compression ratio. ffmpeg has a collection of options
providing certain encoding speeds such as ultrafast, superfast, veryfast,
faster, fast, medium (default), slow, slower, and veryslow.
A slower preset will provide better compression (compression is quality per file size). For example, if you target a specific file size or constant bit rate, you will achieve better quality with a slower preset. Similarly, choosing a slower preset will save bitrate for constant quality encoding. Use the slowest preset that you have patience for, haha.
-crf 24
Constant Rate Factor configuration or crf is a procedure that allows the encoder to
attempt to achieve a certain output quality for the whole file while controlling the
output file size. A lower CRF value results in higher quality but larger file size.
The values for this argument will depend on which encoder you’re using. For example,
I’m using the x264 encoder like in the
above command. Hence, the possible value is an integer from 0-51.
-c:v libx264
-c:v libx264 specifies the codec to be used for the video stream of the output file.
The “v” in “c:v” stands for video. The libx264 is the codec name, it’s a codec library
for H.264 video compression. It tells ffmpeg to use the libx264 codec to encode the video
stream in the output file. Also, -vcodec and -codec:v
is an alias for -c:v.
You can see the supported codecs list by running ffmpeg -codecs. Or, if you want a
more fine-grained list, you can see encoders or decoders using ffmpeg -encoders or
ffmpeg -decoders. And see more detailed information using ffmpeg -h encoder=libx264 or
ffmpeg -h decoder=aac. Similarly, you can do the same for listing the formats
supported by ffmpeg using ffmpeg -formats.
-an
In ffmpeg, the -an option tells ffmpeg to disable the audio stream in the output file. It stands for “audio disable”. Alternatively, we also can:-
-
Use the
-vcodec copyoption: This option tells ffmpeg to only include the video stream in the output file. For example,ffmpeg -i input.mp4 -vcodec copy output.mp4 -
Use the
-mapoption: This option allows you to specify which streams from the input file should be included in the output file. For example,ffmpeg -i input.mp4 -map 0:v -c:v libx264 output.mp4. This will only include the first video stream from the input file in the output file. -
Use the
-codec:a noneinstead of the-anoption In contrast,-vnrefers to video disable..
When you include one of these flags in a command, ffmpeg will not process any audio stream from the input file, and it will not include any audio stream in the output file.
Multimedia Files
Video(s) typically includes visual information, such as images and animation, while the audio has sound and speech. By separating the video and audio streams,
ffmpegcan process and manipulate them independently, allowing for more flexibility and control when working with multimedia files.
When we ran the previous command, we did not specify that we wanted audio streams included in the output file. We can do that via the following:-
ffmpeg -i hehe-peter.mp4 \
    -filter:v "setpts=0.5*PTS" \
    -preset fast \
    -crf 24 \
    -c:v libx264 \
    -c:a copy \
    output.mp4
The -c:a option or alias -acodec copy in ffmpeg specifies the codec to be used
for the audio stream. It stands for codec:audio.
We can use it to set the codec for the output audio file. For example, -c:a aac
tells ffmpeg to use the AAC codec for the audio stream, while -c:a mp3 is for
MP3 codec.
-acodec copy or -c:a copy is a command line option for the ffmpeg tool that tells
it to copy the audio stream from the input file to the output file without
re-encoding. In other words, it copies the audio stream “as is” from the input to
the output file. This can save time and preserve the original audio quality. This
option is used when you want to remux a video file or change the container format
without changing the audio codec or when you want to extract audio from a video
file and save it as a separate audio file.
If this option is not specified, ffmpeg will use the default codec for the output container format. However, you can avoid passing this argument if you don’t want to copy all the audio streams.
Well, what if you want to fast-forward both audio and video streams? would appending
-acodec copy work? Let’s see what’s the outcome.
Did you see? The video is fast-forwarded but the audio isn’t. And we are still left with the original duration. Why? you may ask.
In ffmpeg, video and audio are treated as separate streams because they
are typically encoded and compressed differently and may have different characteristics,
such as frame rate and bit rate. This is because video and audio are two distinct
types of media that are often combined in a single file for playback. So this why
we need to take care both the audio and video streams separately when fast-forwarding
or slow-downing multimedia files.
Fast forward (video & audio)
ffmpeg -i hehe-peter.mp4 \
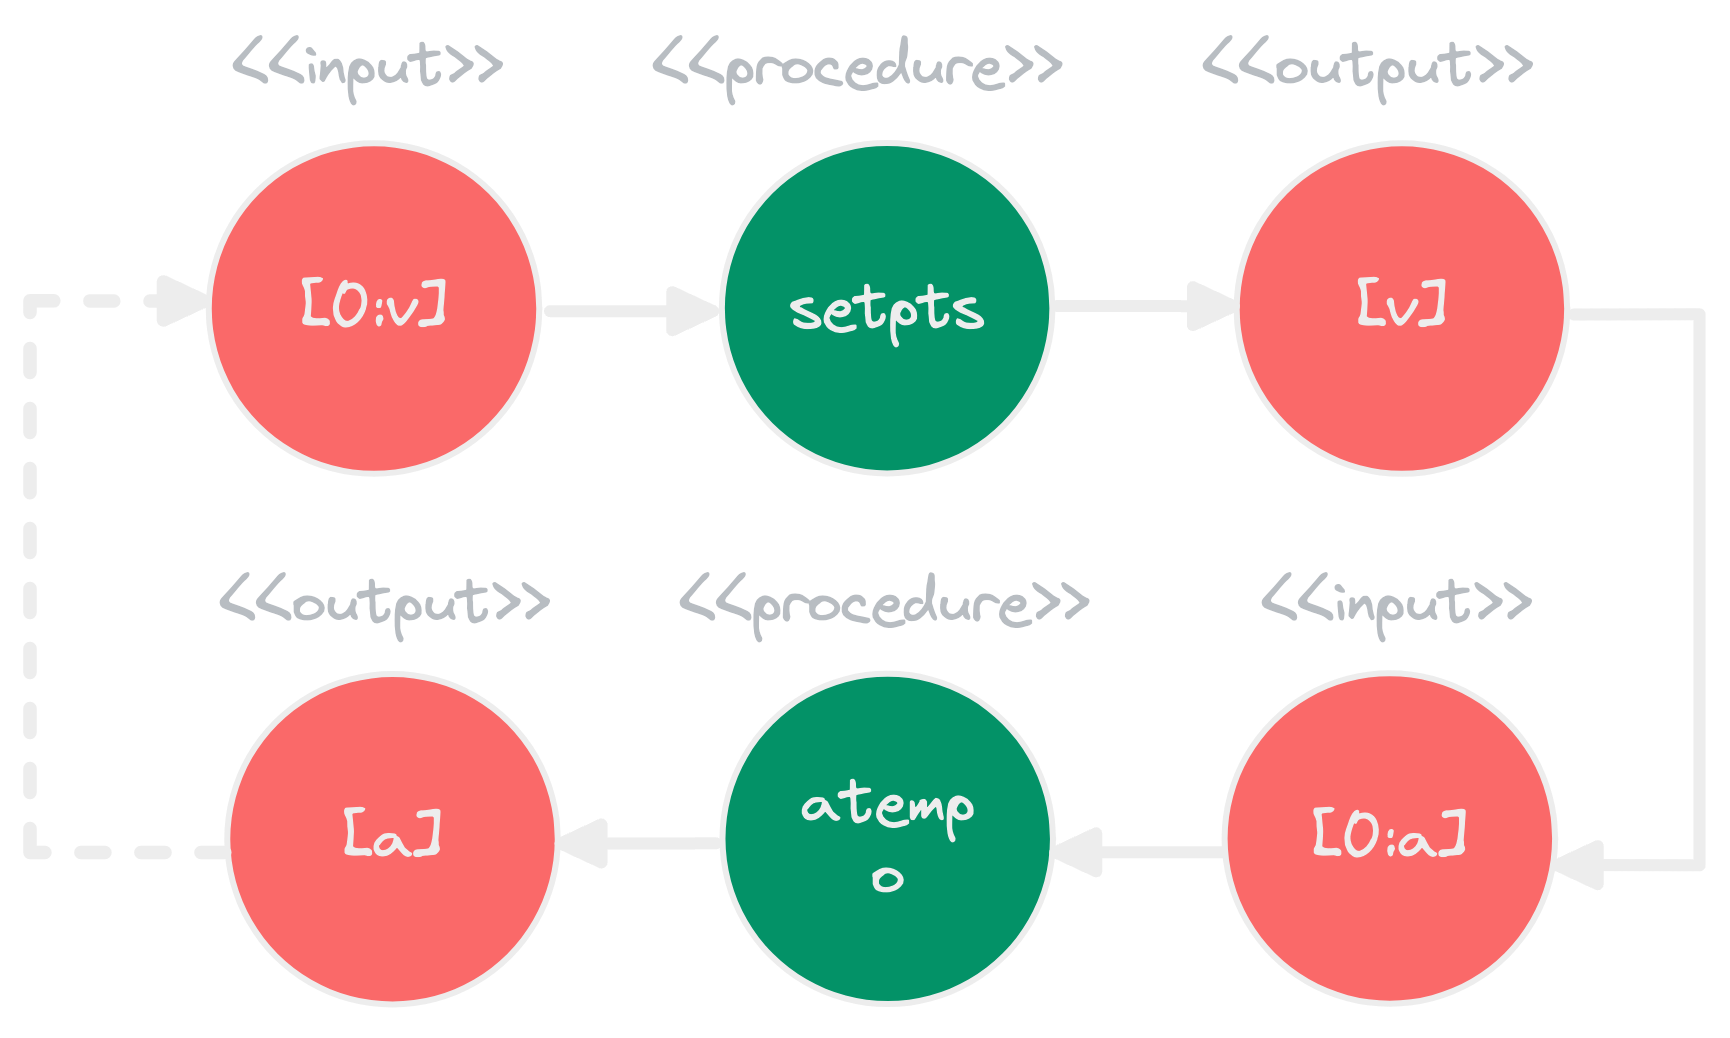
-filter_complex "[0:v]setpts=0.5*PTS[v];[0:a]atempo=2.0[a]" \
-map "[v]" \
-map "[a]" \
-preset fast \
-crf 24 \
-c:v libx264 \
output-2x-audio-and-video.mp4Executing the above command with the correct input and a targeted output file will yield the fast-forwarded video and audio.
And would you look at that! I’ve just ruined that masterpiece, lol.
But seriously though, I think ffmpeg is pretty cool because it has all these
fancy features :)
Behind the scenes (cont.)
-filter_complex "..."
In ffmpeg, the -filter-complex option specifies a complex filtergraph.
A filtergraph is a directed acyclic graph of connected filters. Each filter
takes one or more inputs, processes them, and produces one or more outputs.
The above command has two filter graph nodes separated by a semicolon.
[0:v]setpts=0.5*PTS[v] is what allows us to fast-forward the video by
2x speed. In this argument, [0:v] tells ffmpeg which video stream
of the input file to use. “0” is the index of the input file, and “v”
specifies that we want to use the video stream.
Note that we use the
atempofilter to change tempo of the audio. However, the value of it are limited to using values between0.5and2.0(so it can slow it down to no less than half the original speed, and speed up to no more than double the input). If you need to, you can get around this limitation by stringing multipleatempofilters together (i.e.,-filter:a "atempo=2.0,atempo=2.0").
Essentially, where 0:v specifies the first video stream of the input file
as the input link for the filter setpts. And the [v] appended at the end
is an output link specification in filtergraphs. It tells ffmpeg to use the
output of a filter as the input for the next filter in the chain or as the
final output if it’s the last filter in the chain.
The brackets
[]are used to specify the inputs and outputs of a filter in a filtergraph. The name inside the brackets (e.g. “v”) is a label or an identifier that can be used to refer to that input or output later in the filtergraph.
-map "..."
In ffmpeg, the -map "[v]" option specifies which streams from the input
file should be included in the output file. It tells ffmpeg to map the output
link set inside the brackets (in this case, "[v]" maps the video and "[a]"
maps the audio) to the output file.
We often use it with filtergraphs, where there can output of the filtergraph
is used as the input for the mapping. We can use the -map option multiple
times to select various streams from the input files and to specify
the order in which they will appear in the output file. Also, note
that if you want to use the entire input file, you can use -map 0
instead of -map "[v]".
Essentially, where 0:v specifies the first video stream of the input file.
If you need a more coarse-grained guide on how to slow-motion or fast-forward
videos, you can refer to the official guide on ffmpeg
wiki.
But for me, ffmpeg documentation is the primary
and most reliable source of information on the tool’s features and capabilities.
Well, that’s it, folks. Thanks a bunch for reading!